Battery switch on travel trailer function is crucial for managing your RV’s power. Understanding how to use and maintain your battery switch is key to avoiding frustrating power outages and ensuring a smooth camping experience. This guide covers everything from the different types of switches and their operation to troubleshooting common problems and essential safety precautions. We’ll explore how your battery switch interacts with other power systems in your travel trailer, like solar panels and converters, and offer tips for maximizing your battery life.
We’ll delve into the specifics of various battery types, including lead-acid, AGM, and lithium, and how they work with different battery switch configurations. We’ll also provide step-by-step instructions for installation and replacement, along with helpful diagrams and troubleshooting flowcharts. By the end, you’ll be confident in managing your travel trailer’s power system.
Understanding Battery Switch Functionality in Travel Trailers
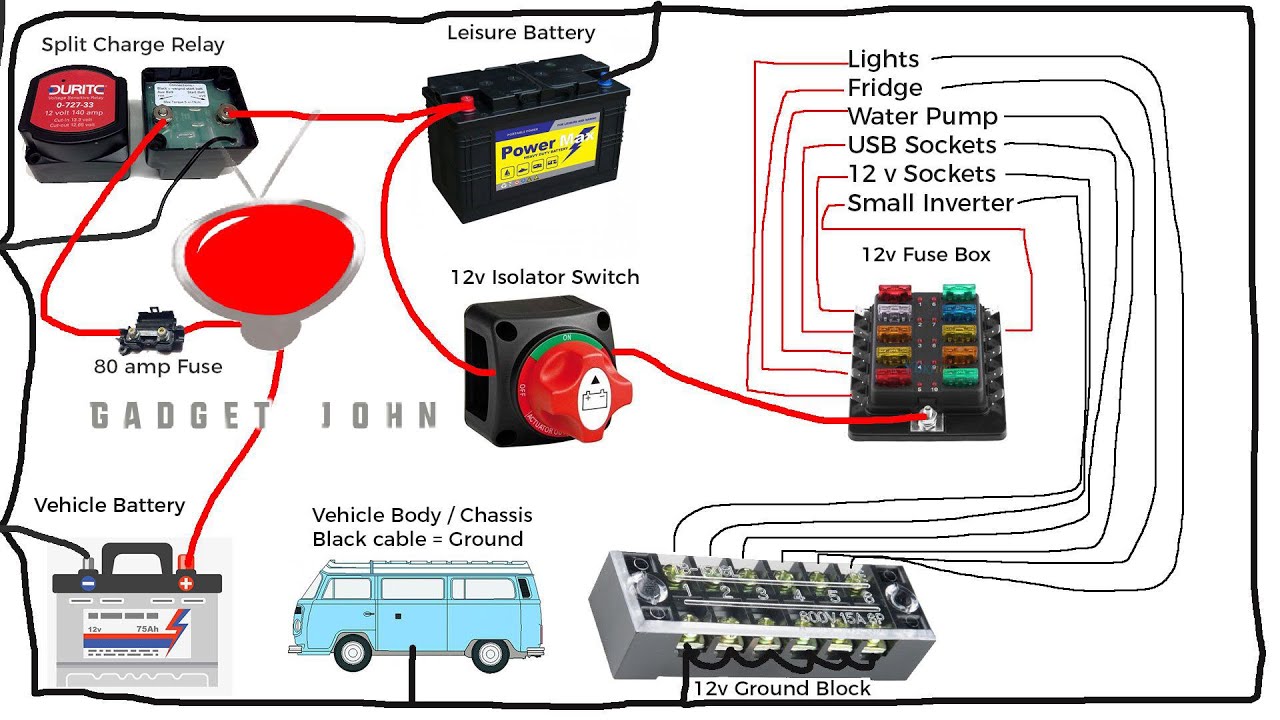
Your travel trailer’s battery switch is a crucial component for managing power from your various batteries, ensuring you have power when and where you need it. Understanding how it works is essential for safe and efficient RVing. This section will break down the different types of switches, their purposes, and how to operate them correctly.
Types of Battery Switches
Travel trailers typically utilize one of three main types of battery switches: 1-2-Both, rotary, and electronic. Each offers a slightly different approach to managing power from your house battery (powering interior lights, appliances, etc.) and chassis battery (powering things like the engine, brakes, and running lights).
Purpose of a Battery Switch
The primary purpose of a battery switch is to isolate and control the flow of power between your house battery bank and your chassis battery. This allows you to charge both batteries independently or together, prevent accidental draining of one battery by another, and conserve battery life. For example, you might want to disconnect your house batteries while the trailer is stored to prevent parasitic drain, but keep the chassis battery connected to maintain the vehicle’s starting capabilities.
Operating a Battery Switch
The specific operation depends on the type of switch, but the general principle remains the same: controlling the flow of power.
Operating a 1-2-Both Switch
This switch typically has three positions: “1” (connects only the house battery), “2” (connects only the chassis battery), and “Both” (connects both batteries). Moving the switch to the desired position establishes the power flow.
Operating a Rotary Switch
Rotary switches often have multiple positions, including “Off,” “House,” “Chassis,” and “Both.” Rotate the switch to select the desired configuration. Some rotary switches also include an additional “Start” position to specifically supply power for starting the vehicle, avoiding potential issues with the house battery during starting.
Operating an Electronic Switch
Electronic switches offer more advanced control, often via a digital display or remote control. They typically provide options to connect/disconnect batteries individually, monitor voltage levels, and even automate charging processes. The specific operation will vary depending on the brand and model of the switch.
Comparison of Battery Switch Types
| Feature | 1-2-Both | Rotary | Electronic |
|---|---|---|---|
| Cost | Low | Medium | High |
| Complexity | Simple | Moderate | High |
| Functionality | Basic on/off | More options (Off, House, Chassis, Both) | Advanced control, monitoring, and automation |
| Durability | Generally durable | Generally durable | Can be susceptible to electronic failures |
Troubleshooting Common Battery Switch Issues

Your travel trailer’s battery switch is a crucial component, ensuring you have power when you need it. Problems with this switch can leave you stranded without lights, appliances, or the ability to charge your batteries. Understanding common issues and how to troubleshoot them is essential for any RVer.Troubleshooting a malfunctioning battery switch often involves a systematic approach, checking connections, the switch itself, and the batteries.
Remember safety first – always disconnect the negative battery terminal before working on any electrical components.
Identifying Common Battery Switch Problems
Several symptoms indicate a problem with your battery switch. No power to your trailer, despite seemingly charged batteries, is a clear sign. Inconsistent power, where lights flicker or appliances intermittently work, points to a faulty connection or a problem within the switch itself. Overheating of the switch is a serious issue, suggesting a short circuit or excessive current draw, requiring immediate attention.
Ignoring this could lead to fire.
Troubleshooting Steps for a Malfunctioning Battery Switch
First, visually inspect the switch for any obvious damage, such as loose wires, corrosion, or burn marks. Tighten any loose connections. Next, check the battery terminals for corrosion and clean them thoroughly. If the problem persists, test the voltage at the battery terminals and at the input and output of the switch using a multimeter. A significant voltage drop across the switch indicates internal resistance or a faulty switch.
Always verify that the switch is correctly positioned for the desired power source.
Testing the Battery Switch with a Multimeter, Battery switch on travel trailer function
To effectively test the battery switch, you’ll need a multimeter set to measure DC voltage. First, turn the switch to the position you want to test (e.g., “Battery,” “Shore Power,” or “Both”). Then, place the multimeter’s positive lead on the positive terminal of the relevant battery or power source, and the negative lead on the negative terminal. Note the voltage reading.
So, you’re planning a trip? Awesome! First things first: get yourself sorted with travel insurance. Check out Aon travel insurance for some solid options; peace of mind is key, right? Then, if you’re an audiophile like me, don’t forget to plan your audiophile travel setup – you wouldn’t want to miss out on your favorite tunes while exploring new places.
Make sure to pack accordingly!
Next, place the positive lead on the output side of the switch (the side connected to your trailer’s electrical system), and the negative lead on the negative terminal. If the voltage readings are significantly different (more than a 0.5-volt difference is usually indicative of a problem), it suggests a problem with the switch or its connections. Repeat this for all switch positions.
So, you’re planning a trip? Awesome! First things first: get yourself sorted with travel insurance. Check out Aon travel insurance for some solid options; peace of mind is priceless, right? Then, if you’re an audiophile like me, don’t forget your tunes! Seriously consider a proper audiophile travel setup to make those long journeys way more enjoyable.
It’s all about the details, people!
If the voltage readings are consistently low, it may indicate a problem with the batteries themselves or a faulty wiring connection, not necessarily the switch.
Troubleshooting Flowchart for a Non-Functional Battery Switch
The following describes a flowchart to visually represent the troubleshooting process:Start -> Visual Inspection (Loose wires, corrosion, damage?) -> Yes (Repair/Replace) -> Test Voltage (Significant drop?) -> Yes (Replace Switch) -> No (Check Batteries/Connections) -> No (Check Switch Position/Connections) -> End. This flowchart represents a simplified troubleshooting process. In reality, more complex diagnostic steps might be necessary depending on the specific symptoms and the trailer’s wiring configuration.
Safety Precautions and Best Practices: Battery Switch On Travel Trailer Function
Working with your travel trailer’s electrical system, especially the battery switch, requires caution. Improper handling can lead to injury from electrical shock, burns, or even battery explosions. Always prioritize safety when performing any maintenance or repairs.Understanding the correct procedures for connecting and disconnecting batteries is crucial to prevent damage to your equipment and avoid personal injury. This includes knowing how to properly isolate the batteries before working on them and understanding the potential hazards of working with lead-acid batteries.
Battery Switch Safety Procedures
Before working on your battery switch or any part of your trailer’s electrical system, always disconnect the negative (-) terminal of your house battery first. This helps to prevent accidental short circuits. Then, disconnect the positive (+) terminal. Remember that working with any electrical system involves a risk of shock. If you are uncomfortable working with electricity, consult a qualified technician.
Always wear safety glasses to protect your eyes from potential sparks or battery acid splashes. Lead-acid batteries produce hydrogen gas, which is highly flammable. Ensure adequate ventilation in the area where you are working to prevent the build-up of this gas. Never smoke or use open flames near batteries.
Correct Battery Connection and Disconnection
When connecting your batteries, always connect the positive (+) terminal first, followed by the negative (-) terminal. This helps prevent accidental short circuits. When disconnecting, reverse this process: disconnect the negative (-) terminal first, then the positive (+) terminal. Before connecting or disconnecting any battery cables, make sure the battery switch is in the “OFF” position. This will ensure that the circuit is completely broken, preventing accidental short circuits or shocks.
Preventing Damage to the Battery Switch and Components
Regularly inspect your battery switch and related components for corrosion, loose connections, or any signs of damage. Clean any corrosion from the terminals and connections using a wire brush and baking soda solution. Tighten any loose connections. Avoid excessive force when operating the switch; forcing it could damage the internal mechanism. Keep the battery switch and surrounding area clean and dry to prevent corrosion and improve longevity.
Protect the switch from excessive moisture or direct sunlight.
Recommended Tools and Equipment
A basic set of tools is necessary for maintaining your battery switch. This includes a wrench or socket set that fits your battery terminals, a wire brush, baking soda, a multimeter for testing voltage and battery health, and safety glasses. Having a pair of insulated gloves is also highly recommended for added protection against electrical shocks. Consider using a battery terminal cleaner and protector to prevent corrosion.
A small container for mixing the baking soda solution is also useful.
Mastering your travel trailer’s battery switch is essential for a reliable and enjoyable RV experience. By understanding the different types of switches, their operation, and troubleshooting techniques, you’ll be well-equipped to handle any power-related issues that may arise. Remember to always prioritize safety when working with your RV’s electrical system, and regular maintenance will prolong the life of your battery and switch.
Happy travels!
Clarifying Questions
What happens if my battery switch is in the “off” position?
With the switch off, both the house and chassis batteries are disconnected from each other and from the trailer’s electrical system. No power will be available to appliances or lights.
Can I use a multimeter to test my battery switch?
Yes, a multimeter can test for continuity and voltage across the switch terminals to determine if it’s functioning correctly. Online resources provide specific instructions for this test.
How often should I check my battery switch?
Regularly inspect your battery switch for corrosion, loose connections, and any signs of damage. A visual check every few months is recommended, especially before and after extended storage.
What are the signs of a bad battery switch?
Symptoms include inconsistent power, no power at all, overheating, or a clicking sound from the switch itself. If you experience any of these, investigate the switch immediately.
